Featured Posts

[Travel][feat1]

Tuscan Butter Salmon

July 16, 2018

Tuscan Butter Salmon


INGREDIENTS
2 tbsp. extra-virgin olive oil
(6-oz) salmon fillets, patted dry with paper towels
kosher salt
Freshly ground black pepper
3 tbsp. unsalted butter
cloves garlic, minced
1 1/2 c. halved cherry tomatoes
2 c. baby spinach
1/2 c. heavy cream
1/4 c. Parmesan
1/4 c. chopped herbs (such as basil and parsley), plus more for garnish
Lemon wedges, for serving (optional)
 
DIRECTIONS
  1. In a large skillet over medium-high heat, heat oil. Season salmon all over with salt and pepper. When oil is shimmering but not smoking, add salmon skin-side up and cook until deeply golden, about 6 minutes. Flip over and cook 2 minutes more. Transfer to a plate.
  2. Reduce heat to medium and add butter. When butter has melted, stir in garlic and cook until fragrant, about 1 minute. Add cherry tomatoes and season with salt and pepper. Cook until tomatoes are beginning to burst then add spinach and cook until spinach is beginning to wilt.
  3. Stir in heavy cream, parmesan and herbs and bring mixture to a simmer. Reduce heat to low and simmer until sauce is slightly reduced, about 3 minutes.
  4. Return salmon back to skillet and spoon over sauce. Simmer until salmon is cooked through, about 3 minutes more.
  5. Garnish with more herbs and squeeze lemon on top before serving.
Tuscan Butter Salmon Tuscan Butter Salmon Reviewed by master fooddy on July 16, 2018 Rating: 5

BAKED CHICKEN CHIMICHANGAS

July 16, 2018

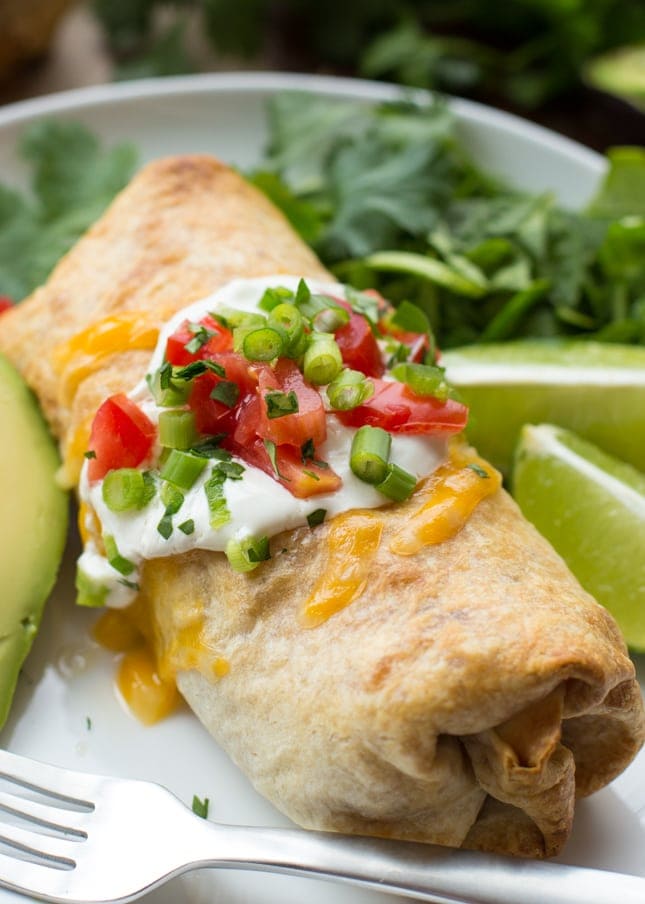
BAKED CHICKEN CHIMICHANGAS


What is a Chimichanga?

Our family loves good Mexican food! Being hispanic, Mexican food was something I grew up on. One of our favorite dishes happens to be Chimichangas! What are chimichangas? A Chimichanga is a deep-fried burrito that is popular in Tex-Mex, Southwestern U.S. cuisine, especially here in Arizona. You can find them at most AZ Mexican restaurants and they’re always SO delicious!
Making our own at home saves time, money and gives us the option to make healthier swaps, like baking instead of frying these delicious rice and chicken chimichangas. They’re easy to whip up thanks to Knorr® Rice Sides ™. You need just 8 ingredients and 30 minutes for this flavorful, delicious dish. Simple, right?!

How to make Chimichangas:

  1. Combine the cooked shredded chicken with salsa, cumin, and oregano; set aside.
  2. Prepare Knorr® Fiesta Sides™ – Mexican Rice according to package directions (cover and simmer for 7 minutes). Remove from the heat.
  3. STIR in the chicken mixture and cheese. Divide the mixture between flour tortillas, wrap and place seam-side down on a lined baking sheet. Brush with the remaining oil and place in oven to bake for 20 minutes (or until golden brown and crispy) at 425 degrees. Serve, if desired, with your favorite toppings such as; shredded cheese, sour cream, chopped tomato, chopped cilantro, chopped green onion, chopped lettuce, and lime wedges.
BAKED CHICKEN AND RICE CHIMICHANGAS
 
Baked Chicken Chimichangas - stuffed with rice, chicken, cheese and more. Such a simple dinner recipe that everyone will love.
Author: 
Recipe type: Main Dish
Serves: 4
INGREDIENTS
  • 1½ c cooked shredded chicken*
  • ⅔ c. salsa**
  • 1½ tsp. ground cumin
  • 1 tsp. dried oregano
  • 2 tbsp. canola or vegetable oil, divided
  • 1 package Knorr® Fiesta Sides™ - Spanish Rice
  • 1¼ c. shredded colby jack cheese***
  • 4 burrito size flour tortillas
INSTRUCTIONS
  1. COMBINE the cooked shredded chicken with salsa, cumin, and oregano; set aside.
  2. Prepare Knorr® Fiesta Sides™ - Mexican Rice according to package directions (cover and simmer for 7 minutes). Remove from the heat.
  3. STIR in the chicken mixture and cheese. Divide the mixture between flour tortillas, wrap and place seam-side down on a lined baking sheet. Brush with the remaining oil and place in oven to bake for 20 minutes (or until golden brown and crispy) at 425 degrees. Serve, if desired, with your favorite toppings such as; shredded cheese, sour cream, chopped tomato, chopped cilantro, chopped green onion, chopped lettuce, and lime wedges.

BAKED CHICKEN CHIMICHANGAS BAKED CHICKEN CHIMICHANGAS Reviewed by master fooddy on July 16, 2018 Rating: 5

CRISPY BAKED CHICKEN

July 16, 2018

CRISPY BAKED CHICKEN


Do you gather with family for Easter? Now that we are back in Arizona, we do, and we always have a HUGE Easter dinner. We gather with the whole Luna clan and my mom and sisters get together for lunch weeks before to figure out the menu (similar to what they do for Thanksgiving). I tend to have different assignments each year, but this year I was assigned the chicken. Yes, we like to have a variety of meats served at the holiday dinner, and usually have ham, a roast, and a chicken dish.
We had recently tried a recipe for Crispy Baked Chicken that was loved by the whole family, so my mom requested that recipe. I was happy to make it because it was easy and really was so delicious. It may be because it’s smothered in sour cream, cheese and crushed crackers and then topped with a creamy sauce. The recipe actually calls for chicken breasts, but since I was trying to feed a lot I ended up using breast tenders. They are about the third or even a quarter the size of large chicken breast, but they worked perfectly for our Easter dinner!!
I was excited to see that the chicken was all gone in a matter of minutes and several family members asked for the recipe. We had gotten it from Just a Pinch, but we made a few adjustments that we think made the recipe event better!! Give it a try yourself and let us know what you think. 😉

Crispy Baked Cheddar Chicken

This Crispy Cheddar Chicken is baked chicken coated in sour cream, cheese and ritz cracker crumbs and topped with a delicious, creamy sauce - it's our new go-to dinner recipe!
Course Main Course
Cuisine American
Prep Time 7 minutes
Cook Time 1 hour
Total Time 1 hour 7 minutes
Servings 8
Calories 269 kcal
Author Lil' Luna

INGREDIENTS

Chicken

  • 4 large boneless skinless chicken breasts cut in half
  • 2 sleeves Ritz crackers
  • 1/4 tsp salt
  • 1/8 tsp pepper
  • 1/2 cup sour cream
  • 3 cups grated cheddar cheese
  • 1 tsp dried parsley
  • fresh parsley for garnish

Sauce

  • 1 can cream of chicken soup
  • 1/8 cup sour cream
  • 2 tbsp butter
  • 2 tbsp milk

INSTRUCTIONS

  1. Preheat oven to 375.
  2. Place crushed crackers in a shallow dish along with salt and pepper. Also place sour cream in a separate baking dish and cheese in another separate dish as well.
  3. Begin by dipping each breast half into sour cream, coating all sides and then place in cheese dish, coating with shredded cheese. Then, place each breast into cracker mixture until well coated.
  4. Place into a greased 9x13. Cover and bake for 50-55 minutes.
  5. Remove foil and bake an additional 10 minutes or until edges are golden brown.
  6. As chicken is finishing cooking, place sauce ingredients into a small pot and cook on medium high heat. Stir until well combined and serve over chicken along with fresh parsley. ENJOY!
CRISPY BAKED CHICKEN CRISPY BAKED CHICKEN Reviewed by master fooddy on July 16, 2018 Rating: 5

HALLOWEEN PUNCH

July 15, 2018

HALLOWEEN PUNCH


Can it really be October tomorrow? Really?! For anyone outside of AZ, I know you’re probably already experiencing the beautiful change of colors that Fall brings. We haven’t experienced that just yet here, so we have to over compensate in the foods we make and then just pretend that it looks like Fall outside. Which brings me to our yummy recipe for today… This beautifully orange Halloween Punch was crazy simple to put together and more importantly was crazy delicious!
We always get together and have a fun family part for Halloween, so we are always keeping our eyes out for fun recipes to try for the kids. This Halloween punch is one we definitely plan on making. It’s delicious, it’s easy and is perfect for the 31st!! If you’re looking for a fun drink to serve at your next party, look no further. This is it!!!

Halloween Punch

This cool Halloween Punch is made with orange juice, pineapple juice, Sprite, orange gelatin and orange Sherbet - perfect for ALL ages!
Course Drinks
Cuisine American
Prep Time 5 minutes
Cook Time 5 minutes
Total Time 10 minutes
Servings 10
Calories 3604 kcal
Author Lil' Luna

INGREDIENTS

  • 46 oz pineapple juice divided
  • 3 oz package of orange gelatin
  • 64 oz orange juice
  • 1 liter sprite
  • 1 quart orange sherbet

INSTRUCTIONS

  1. In small pot, bring 1 cup of pineapple juice to a boil. Stir in gelatin until dissolved.
  2. Let cool and transfer to a large container. Add orange juice and remaining pineapple juice. Chill.
  3. Just before serving, pour into a punch bowl, add Sprite and mix well.
  4. Top with scoops of sherbet and ENJOY!

HALLOWEEN PUNCH HALLOWEEN PUNCH Reviewed by master fooddy on July 15, 2018 Rating: 5

BAKED CHICKEN FINGERS

July 15, 2018

BAKED CHICKEN FINGERS


Baked Chicken Tenders

Hello again! It’s Alicia from The Baker Upstairs and I am back to share one of my absolute favorite recipes with you. These baked chicken fingers are super easy to make, incredibly delicious, and good for you too! My family loves chicken pretty much any way I make it, but these chicken fingers are a special favorite. They’re crisp on the outside and juicy and tender on the inside, and always come out delicious!
They’re also very simple too which is the main reason why I love them. And I think we can all agree that easy and delicious recipes the whole family loves are the best!

Chicken Fingers vs. Chicken Tenders?

Chicken Fingers, Chicken Tenders, even Chicken Strips! We’ve heard several names for this kind of chicken dish. Is there a difference between the three, or are they all referring to the same thing? The only real difference is that Chicken Tenders usually use a different part of the chicken, the tenderloin. Aside from that, fingers, tenders, and strips all refer to pieces of chicken that are breaded and fried (or in this case, baked). But let’s be honest, who actually cares what the technical name is when they taste SO good? 😉
This recipe calls for chicken breast, however, you can easily substitute it for 1 1/2 pounds of chicken tenderloin. The tenderloin is just a different muscle right next to the breast, and is supposedly much more tender (hence the name) when it’s cooked. When you purchase them at the store, they already come in smaller pieces, so that would take out a step in this recipe if you decide to substitute it for the breast! Either way, these chicken fingers will taste amazing after being breaded and baked!!

How to Make Chicken Tenders:

It does take a little time to individually dip each piece of chicken, but once you’ve got your dipping station set up, it’s very simple and straightforward. I love using kid plates from Ikea for dipping because they have a nice lip around them but are still pretty shallow. Flour plus salt and pepper goes in the first plate, egg in the second, and a mixture of panko and regular bread crumbs in the third plate. I like to bake them on a parchment-lined baking sheet for easy clean up, but they also work well on a greased baking sheet. Usually, I find myself making extras to have on hand for lunches and snacks. Once you get dipping, it’s easy to just make a bunch!
BAKED CHICKEN FINGERS RECIPE
 
Prep time
Cook time
Total time
 
A healthy way to eat chicken that kids absolutely love - Baked Chicken Fingers! Chicken dipped in flour, egg, and panko, then baked to a crispy perfection! Not to mention they're SO easy to make!
Author: 
Recipe type: Main
Serves: 10-12
INGREDIENTS
  • 1½ pounds chicken breast, trimmed and cut into strips (approximately 3 large breasts)
  • 1 cup flour
  • 1 teaspoon salt
  • ½ teaspoon pepper
  • 2 eggs
  • ¾ cup bread crumbs (I used Italian but regular work great too)
  • 1 cup panko bread crumbs
  • cooking spray
INSTRUCTIONS
  1. Preheat the oven to 400. Line a baking sheet with parchment paper or spray with cooking spray.
  2. In a shallow dish or pie pan, whisk together the flour, salt and pepper. In another shallow dish, beat the eggs lightly. In a third dish, whisk together the regular and panko bread crumbs.
  3. Dip each piece of chicken in the flour, then in the egg, then in the bread crumbs, and place on the prepared baking sheet. (I find that it helps to use one hand for dipping in the dry ingredients and one hand for dipping in the eggs, to prevent making a big mess.)
  4. Spray each of the chicken strips lightly with cooking spray. Bake 20-25 minutes, or until golden brown and cooked through. Enjoy!
BAKED CHICKEN FINGERS BAKED CHICKEN FINGERS Reviewed by master fooddy on July 15, 2018 Rating: 5

GREEN CHILE CHICKEN ENCHILADAS

July 15, 2018

GREEN CHILE CHICKEN ENCHILADAS


Easy Enchilada Recipe

Did you know I’m half Mexican? Anyone who knows me is pretty surprised when they find this out because I’m pretty darn white. Although I may be white I still LOVE to cook Mexican dishes. One of the recipes I make all the time is Green Chile Chicken Enchiladas. Not only are they so easy but they are so good and are a hit at any function! I also like that they are easy to make in mass quantities and are also good if you make and freeze them.
They only require a few ingredients to make, like corn tortillas, chicken, sour cream, green chiles, cheese, salt, pepper and enchilada sauce. I usually have all these ingredients on hand so we make them quite often. It’s also a great recipe to make to give to those who are stocking up on freezer meals. I love giving these enchiladas (frozen) to new moms so they have a simple and delicious dinner for their families. 😉\

How to Make Chicken Enchiladas:

  1. In a small bowl, combine chicken, 1 cup cheese, green chiles, salt and pepper.
  2. In a small skillet, bring enchilada sauce to boil and then remove from heat.
  3. Dip each tortilla into heated sauce for a few seconds to soften.
  4. Spoon 1/3 cup of chicken mixture and 2 tablespoons sour cream down center for each tortilla (I usually put the sour cream in a sandwich bag and cut the bottom tip which makes it easier to squirt right down the center!).
  5. Roll the tortilla and place seam-side down in 8×8 (or 9×9) inch baking dish.
  6. Pour remaining heated enchilada sauce over top. Sprinkle with remaining 1 cup cheese.
  7. Bake 20 minutes at 350.
This recipe makes 4 servings, but we usually double it to feed a larger crowd and use a 9×13 pan!

Easy Chicken Enchilada Recipe

One of our favorite Mexican dishes - Green Chile Chicken Enchiladas recipe!! Corn tortillas stuffed with chicken, cheese, las palmas green chile enchilada sauce, sour cream, and green chiles, topped with more sauce and cheese! The whole family loves these easy chicken enchiladas!
Course Main Course
Cuisine Mexican
Prep Time 20 minutes
Cook Time 20 minutes
Total Time 40 minutes
Servings 4
Calories 588 kcal
Author Kristyn Merkley

INGREDIENTS

  • 2 c chicken cooked and shredded
  • 2 c monterey jack cheese shredded
  • 19 oz. Las Palmas green chile enchilada sauce
  • 1 c sour cream
  • 6-8 corn tortillas
  • 4.5 oz can chopped green chiles
  • salt and pepper

INSTRUCTIONS

  1. In a small bowl, combine chicken, 1 cup cheese, green chiles, salt and pepper.
  2. In a small skillet, bring enchilada sauce to boil. Remove from heat.
  3. Dip each tortilla into heated sauce for a few seconds to soften.
  4. Spoon ⅓ cup of chicken mixture and 2 tablespoons sour cream down center for each tortilla (I usually put the sour cream in a sandwich bag and cut the bottom tip which makes it easier to squirt right down the center)
  5. Roll the tortilla and place seam-side down in 8x8 (or 9x9) inch baking dish.
  6. Repeat with remaining tortillas. Pour remaining heated enchilada sauce over top. Sprinkle with remaining 1 cup cheese.
  7. Bake 20 minutes at 350.

RECIPE NOTES

FOR A 9×13 PAN… INGREDIENTS:
  • 3 – 4 CUPS CHICKEN
  • 3 CUPS MONTEREY JACK CHEESE
  • 1 – 28 OZ. CAN LAS PALMAS GREEN CHILE ENCHILADA SAUCE
  • 12-15 CORN TORTILLAS
  • 1 – 2 CANS 4.5 OZ. CHOPPED GREEN CHILES
  • 1 1/2 – 2 CUPS SOUR CREAM
  • SALT & PEPPER
GREEN CHILE CHICKEN ENCHILADAS GREEN CHILE CHICKEN ENCHILADAS Reviewed by master fooddy on July 15, 2018 Rating: 5
Powered by Blogger.